In Lab Turn-In (GSP 270 face-to-face classes only)
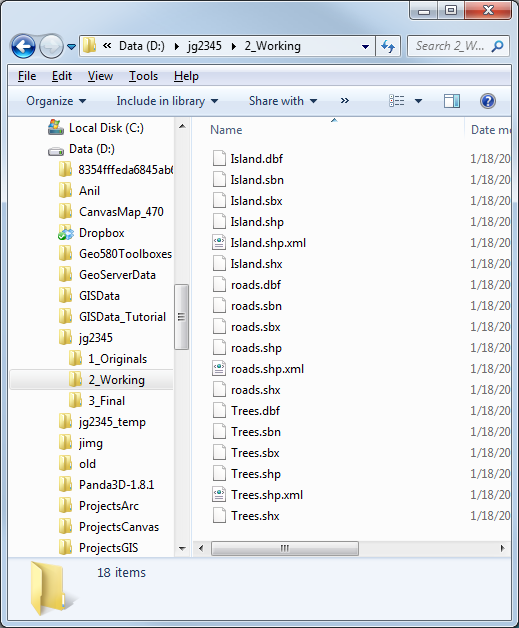
Before leaving, open your "D" drive and open the folder you have been working in. Please make sure the "D" drive letter is visible. Then, take a screen shot of your folder structure and upload it to Canvas. You can take a screen shot with either of the options below:
Original: Using the "Snipping Tool":
- Click on the start icon in the lower left of the screen.
- Enter "Snip" inot the search box that appears
- Click on the "Snipping Tool".
- Draw a box around the window with your mouse cursor.
- In the window that appears, click "File -> Save As" and save the file as a "PNG" to your "Finals" folder.
New: Using "Print Scrn":
- Open a directory window to your "Working" folder.
- Make sure the window is selected by clicking in the area at the top of the window.
- Press "Alt" and "Print Scrn" on your keyboard at the same time. This will take a screen shot of the window and put it on the clipboard.
- Open MS-Word and paste the image into the document.
- Save the file to your "3_Final" folder and then upload it into Canvas.
The image should look something like the following:
Take Home Turn-In
Due next week at the start of lab:
- A lab report with the following sections – Introduction, Methods, Results, Conclusion
- For this lab, you can make up the material for the introduction (e.g. my uncle left me a million dollars so I could build my own island). Methods should describe how you designed your island in ArcMap. The results should describe your island and could include area, length of roads, etc.. The Conclusion can be made up again.
- A 6 inch locator map of your island in the introduction section
- A 6 inch map of your island in the results section
- Add basic cartographic elements to your dream island in layout view.
- Select View → Layout View.
- Click on the “Insert” tab at the top of the ArcMap interface, and take a look at the cartographic elements that can be added (Legend, Scale Bar, North Arrow, Title).
- Use these tools to add the name of your island as the title, a scale bar and a north arrow. Make sure to only use appropriate cartographic elements. If you are having difficulty with this, refer to the Basic Cartographic Design Reference.
- Insert your map into a final report (MS-Word report template provided). You can reference the learning module on Creating Spatial Analysis Reports with MS-Word as needed.
- Upload your completed report to Canvas in the same place you uploaded the In-Lab Turn-In
Note: Read the cartographic reference in detail. Not all maps are equal and what is included in a wall map should not be included in a map in a report.
Labs will be graded approximately 1 to 2 weeks from the date they are due, depending on the work load of your instructor
Once the lab is graded, take some time to view the grading comments provided by your lab instructor. This will be found either in Canvas or in the Word Document, depending on your instructors’ preferences. Please check the comments each time so your work can continually improve.